
Building a WordPress website might seem daunting, but with the right tools and guidance, it’s an achievable and rewarding process.
WordPress powers over 43% of all websites on the internet, making it the undisputed leader for everyone from solo bloggers to global businesses. Its flexibility, scalability, and vast community support make it the perfect platform to build your digital home in 2025. This guide is designed to cut through the noise and provide a clear, step-by-step path to get your site live.
Welcome to the world of WordPress: Why now is the best time
In 2025, a professional website is non-negotiable for any serious business or creator. WordPress has evolved far beyond its blogging roots into a full-fledged content management system (CMS) capable of running anything from e-commerce stores to complex corporate sites. The introduction of modern tools like the Block Editor and Full Site Editing has made it more intuitive and powerful than ever.
Starting now means leveraging mature, user-friendly technology to build a website that is both beautiful and functional, without needing to write a single line of code.
What We’ll Cover: From idea to launch
This comprehensive guide will walk you through every essential stage of the website creation process. We’ll start with the fundamental decisions—choosing your platform, domain, and hosting. From there, we’ll dive into installing and configuring WordPress, customising your site’s design with themes, and adding your first pages of content. We will cover the essentials of plugins, SEO, and security to ensure your website is not only live but also prepared for growth and success.
Step 1: Laying the foundation – choosing your digital home
Before you can build your house, you need to own the land and have an address. The same principle applies to your website. This foundational step involves securing your unique online identity and the server space where your website files will live. Getting these elements right is critical for your site’s performance, security, and overall success.
WordPress.org vs. WordPress.com: Understanding the crucial difference for beginners
Key differences between the self-hosted WordPress.org and the hosted service WordPress.com.
One of the first points of confusion for newcomers is the difference between WordPress.org and WordPress.com.
- WordPress.org: This is the self-hosted version of WordPress. You download the software for free and install it on your own web hosting account. It gives you complete control over your website, allowing you to install any theme or plugin and customise it without limitations. This is the version we recommend and will focus on in this guide.
- WordPress.com: This is a for-profit, hosted service that uses the WordPress software. It’s simpler to start with but comes with significant limitations on the free and lower-tiered plans, such as restrictions on themes, plugins, and monetisation.
For any serious business or long-term project, WordPress.org is the superior choice because of its freedom and scalability.
Choosing and registering your domain name
Your domain name is your website’s address on the internet (e.g., yourbusiness.com). It’s a core part of your brand identity. When choosing a domain, aim for one that is:
- Relevant: It should reflect your business or personal brand.
- Memorable: easy for a user to recall and type.
- Concise: shorter is better.
- Credible: Use a common extension like .co.uk or .com if possible, as it’s the most recognised.
You can register a domain through registrars like Namecheap or GoDaddy, or often get one for free for the first year through your chosen hosting provider. At BBI Brandboost, we also offer domain name management, we can register and look after your domain name and take care of any renewals on your behalf.
Selecting the right web hosting for your WordPress website
Web hosting is the engine that powers your website. It’s a service that provides the server space where your website’s files, images, and content are stored, making them accessible to users worldwide. For a WordPress site, choosing the right hosting is crucial for speed, security, and reliability.
- Shared Hosting: The most affordable option, where you share server resources with other sites. It’s a great starting point for beginners.
- Managed WordPress Hosting: A specialised service optimised specifically for WordPress. It often includes automatic updates, enhanced security, and expert support, making it an excellent, hassle-free option for those who want to focus on their content.
Look for a hosting provider with a strong reputation for uptime, customer support, and one-click WordPress installation features.
BBI Offers managed WordPress hosting service which ticks all the boxes for any WordPress website, whether you are just starting out or have an established presence.
Step 1: Pointing your domain to your hosting
If you bought your domain and hosting from different providers, you need to connect them. This is done by changing your domain’s “nameservers” to point to your hosting account. Your hosting provider will give you the specific nameserver addresses (e.g., ns1.hostingcompany.com). You’ll log in to your domain registrar’s dashboard and update these settings. The change can take a few hours to propagate across the internet.
Step 2: Getting WordPress up and running
With your domain and hosting ready, it’s time to install the WordPress software. Thanks to modern hosting tools, this process is faster and easier than ever. Once installed, a few initial configuration tweaks will set your site up for optimal performance and search engine visibility.
Installing WordPress: The One-Click Wonder
Forget complicated manual installations. Nearly every reputable web host now offers a “one-click” or automated WordPress installer. You’ll typically find this tool in your hosting control panel (like cPanel). The process involves:
- Finding the WordPress installer icon.
- Choosing the domain where you want to install it.
- Entering basic site information like your desired username, password, and email.
Clicking “Install.”
The system will automatically create the necessary databases and install the latest version of WordPress on your server in minutes.
Initial WordPress Setup: Essential settings for your new site
After installation, log in to your WordPress dashboard by visiting yourdomain.com/wp-admin. Before adding content, navigate to Settings > General. Here, you should:
- Set your site title and tagline: This text appears in browser tabs and search engine results.
- Confirm your WordPress address (URL) and site address (URL): Ensure these are correct.
- Set your timezone: This ensures your scheduled posts publish at the correct local time.
- During development, it’s wise to check the box for “Discourage search engines from indexing this site” under Settings > Reading. Remember to uncheck this when you launch!
Configuring permalinks for SEO and user friendliness
Permalinks are the permanent URLs for your individual pages and posts. By default, WordPress might use a structure that isn’t ideal for users or search engines (e.g., ?p=123). To fix this, go to Settings > Permalinks. Select the “post name” option. This creates clean, descriptive URLs like yourdomain.com/about-us, which is far better for SEO and helps users understand the content of the page at a glance.
Step 3: Navigating Your WordPress dashboard
The WordPress dashboard is your site’s control panel. It’s where you’ll manage everything from content and design to functionality and settings. While it can look intimidating at first, its layout is logical and easy to master.
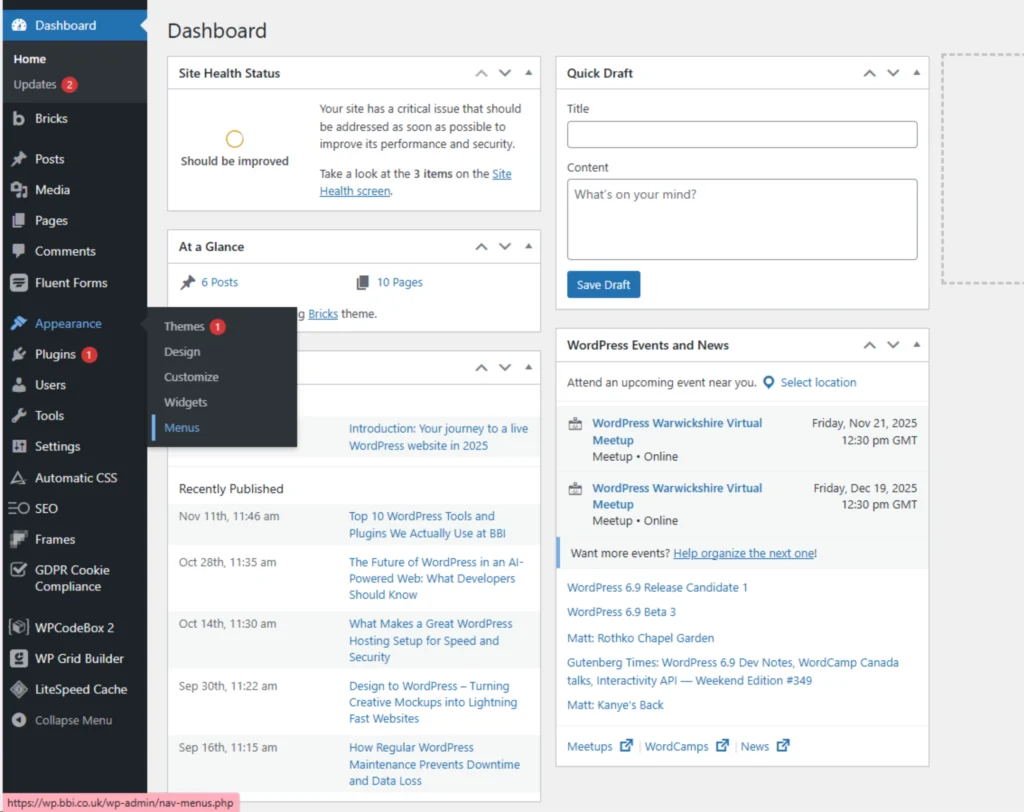
Understanding the WordPress admin area
When you log in, you’ll see two main navigation elements:
- The admin bar (top): A black bar at the top of the screen with quick links to add new posts or pages, view comments, and edit your profile.
- The main navigation menu (left): This is the primary menu where you’ll find all the administrative tools to manage your site.
The central area of the screen is your workspace, which changes depending on which menu item you’ve selected.
Mastering the Core Menu: Posts, Pages, Media, Appearance, Plugins, Settings
Understanding the purpose of the key left hand menu items is essential:
- Posts: For creating time-sensitive content like blog articles.
- Pages: For creating static, timeless content like your “About” or “Contact” page.
- Media: Your library for all uploaded images, videos, and files.
- Appearance: Where you manage your site’s design, including themes, menus, and widgets.
- Plugins: The hub for extending your site’s functionality with new features.
- Settings: The control panel for global site configurations.
Quick Settings Overview: General, Writing, Reading, Discussion
Beyond the General settings we’ve already covered, a few others are important:
- Writing: Configure default post categories and formats.
- Reading: Set what your homepage displays—either your latest posts or a static page. You’ll set your “Homepage” and “Posts page” here once they are created.
Discussion: Manage settings for comments to combat spam and control user engagement
Step 4: Crafting Your Site’s Look – Themes and Customisation
Your WordPress theme defines the entire visual design and layout of your website. It’s one of the most exciting parts of the process, where you transform a blank slate into a professional-looking site that reflects your brand.
Choosing Your Theme: The Face of Your Website in 2025
A theme is a collection of templates and stylesheets that dictate your site’s appearance. When selecting from thousands of available themes, consider:
- Responsiveness: Does it look great on desktops, tablets, and mobile devices? This is critical for both user experience and Google rankings.
- Simplicity: A clean, uncluttered design often performs better and is easier for users to navigate.
- Ratings and Reviews: Check what other users are saying about the theme’s quality and the developer’s support.
- Compatibility: Ensure it’s compatible with the latest version of WordPress and popular plugins.
Installing and activating Your WordPress theme
To install a free theme from the official WordPress repository, navigate to Appearance > Themes and click “Add New.” You can search or browse the collection, preview themes, and click “Install, followed by “Activate.” If you’ve purchased a premium theme, you’ll typically download a .zip file and upload it using the “Upload Theme” button on the same screen.
Customising your theme: Making it your own with the WordPress Customiser
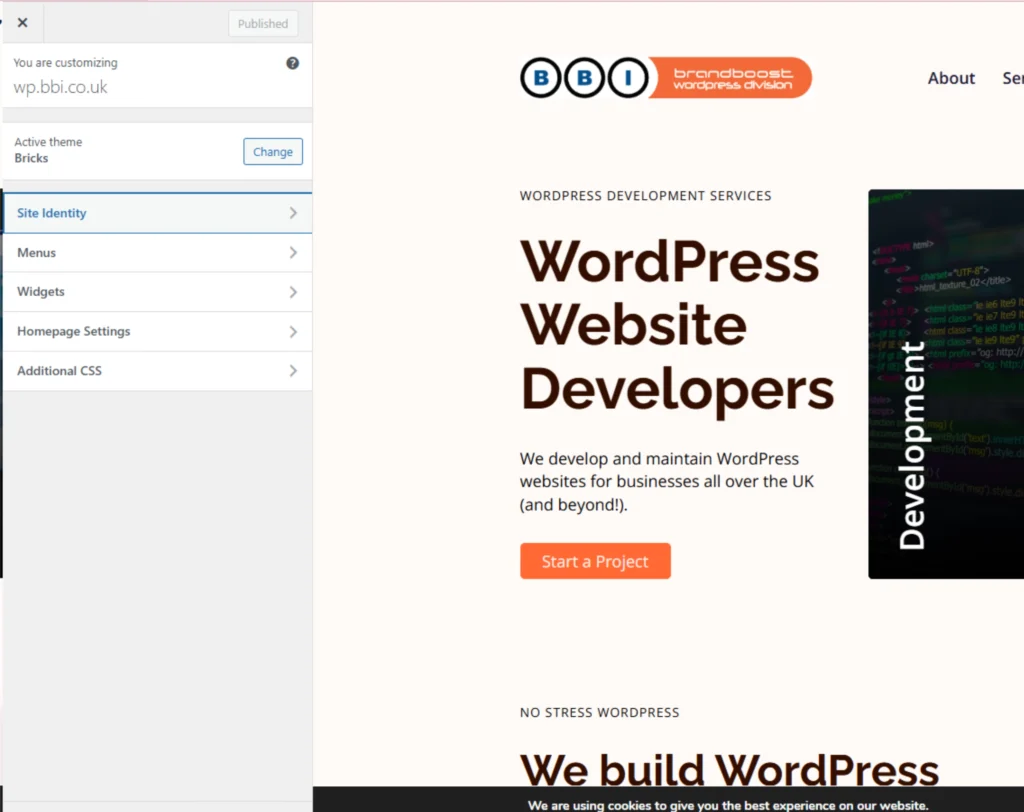
Once your theme is active, you can personalise it by going to Appearance > Customise. This opens the live Theme Customiser, which allows you to see changes in real-time. Depending on the theme, you can typically modify:
- Site Identity (logo, title, favicon)
- Colours and typography
- Header and footer layouts
- Homepage settings
Understanding modern WordPress design: The block editor & full site editing (FSE) basics
Modern WordPress revolves around the Block Editor (also known as Gutenberg). Instead of a single text field, your content is built with individual “blocks” for paragraphs, headings, images, columns, and more. This provides incredible flexibility. Many new themes in 2025 are “Block Themes” that support Full Site Editing (FSE). FSE extends the block concept to your entire site, allowing you to visually edit headers, footers, and other templates directly within the editor, giving you unprecedented control over your site’s layout.
Setting up your navigation menu and essential widgets
A clear navigation menu is vital for a good user experience. Go to Appearance > Menus to create your first menu. Add the essential pages you’ve created (like Home, About, Contact) and assign the menu to a location, such as the “Primary Menu” in your header. Widgets are small blocks of content you can add to specific areas like your sidebar or footer. You can manage them under Appearance > Widgets or directly in the Customiser.
Step 5: Adding your First content – pages and posts
With the structure and design in place, it’s time to add the content that will inform, engage, and convert your users. WordPress makes a fundamental distinction between two main content types: Pages and Posts.
Understanding Pages vs. Posts: When to use which
Pages: Used for static, “evergreen” content that doesn’t change often. They are not dated and don’t appear in your blog feed. Examples include your “About Us,” “Contact,” “Services,” or “Privacy Policy” pages.
- Posts: Used for dynamic, timely content, usually displayed in reverse chronological order on your blog page. They are meant for articles, news updates, and announcements. Posts can be organised with categories and tags.
- Creating Your essential pages: Homepage, About, Contact, Privacy Policy – Every professional website needs a few core pages to build trust and provide essential information.
- Homepage: The front door to your site. It should clearly communicate what your business does and guide users to key areas.
- About Page: Tell your story. Explain who you are, what you stand for, and why users should trust you.
- Contact Page: Make it easy for people to get in touch. Include a contact form, email address, and any other relevant details.
- Privacy Policy Page: A legal requirement in many regions, this page informs users how you collect and handle their data.
Publishing your first blog post: Your voice online
To create a new post, go to Posts > Add New. This is where you can start sharing your expertise and connecting with your audience. Give your post a compelling title, write your content using the block editor, and assign it to a relevant category. A consistent blogging strategy is one of the most effective ways to improve your SEO and drive traffic to your business website.
Working with the Block Editor (Gutenberg): Building with content blocks
The block editor makes content creation intuitive. To add new content, simply click the + icon and choose a block. You can add paragraphs, headings, images, galleries, buttons, videos, and much more. You can easily drag and drop blocks to rearrange your content, creating complex layouts without any code. Mastering the block editor is key to creating engaging content for your users.
Organising your content: Categories and tags for better navigation
Properly organising your posts helps both users and search engines understand your content structure.
- Categories: These are broad groupings for your posts. Think of them as the main sections of your blog (e.g., “Marketing,” “Web Design”). A post should typically belong to only one or two categories.
- Tags: These are more specific keywords that describe the details of a post (e.g., “SEO,” “social media,” “Google Analytics”). You can add multiple tags to a single post.
Managing your media library: Adding and Optimising images and videos
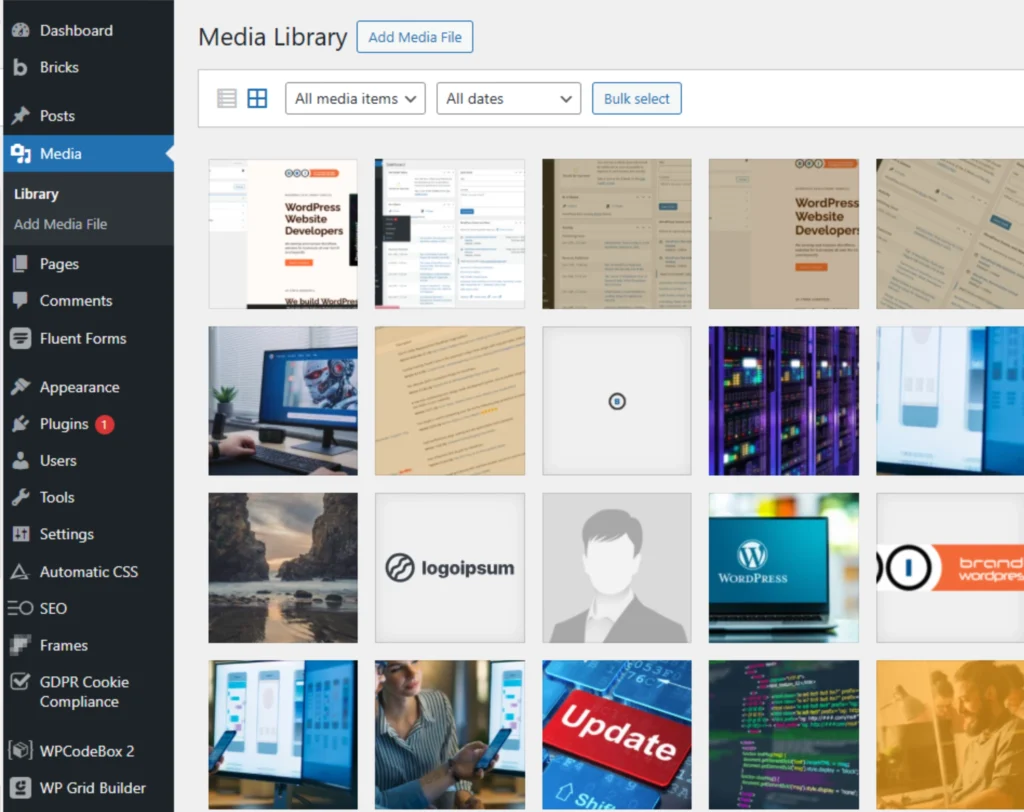
Visuals make your content more engaging. You can upload media directly into a post or page, or manage everything from the Media > Library menu. For better SEO and accessibility, always give your images descriptive file names before uploading and fill out the “Alternative Text” (alt text) field with a brief description of the image. This helps search engines understand the image content and assists users with visual impairments.
Conclusion
Congratulations! By following these steps, you have successfully navigated the entire process of launching a WordPress website in 2025, from securing a domain to publishing your first piece of content. You have laid a robust foundation by choosing the right hosting, installed and configured the world’s most popular CMS, and shaped your site’s design with a modern theme. You now have a live, functional website ready to serve as the digital hub for your business or personal brand.
However, launching your site is not the end of the journey; it’s the beginning. Your focus should now shift to growth, security, and optimisation. Here are your immediate next steps:
- Install essential plugins: Enhance your site’s functionality with key plugins for SEO (like Yoast SEO or Rank Math), security (like Wordfence), backups (like UpdraftPlus), and contact forms.
- Set up analytics: Install Google Analytics to start tracking your website traffic. Understanding how users find and interact with your site is crucial for making informed decisions.
- Implement a content strategy: Plan and consistently create high-quality content that provides value to your target audience. This is the single most important factor for long-term SEO success and user engagement.
- Prioritise security and maintenance: Regularly update your WordPress core, themes, and plugins. Perform routine backups to protect your hard work from potential threats.
You have the tools and the knowledge to build a powerful online presence. Continue to explore, learn, and create, and your WordPress website will become an invaluable asset for years to come.